
How to Remove Header and Footer To Create A Landing Page With Squarespace

Something that comes up often with my clients is, “do I need Leadpages to create a funnel system or put a freebie out to the world?” The answer is absolutely NO! You do not need to pay for an additional service if you already have an awesome on brand website. Landing pages are definitely one of the best entry points for freebies, launches, courses, or promotions, they even work exceptionally well for providing extra info about services or products we sell, so you can snag those valuable emails and grow your list.
You can certainly pay for landing pages and templates through services like Mailchimp or Leadpages but I’m a big proponent of keeping your potential customers and members on your site! It means more chance at them looking around, and I have my analytics all in one place!
You know me and branding, consistency is everything. From fonts, to colours, and graphics, you want to be cohesive. You’ve already spent the time branding your website, why redo all that work for landing pages? You can literally duplicate a page you already have made and make a few tweaks here and there instead of starting from scratch. It’s also super cost effective and us busy entrepreneurs know that budget is important.
Don’t worry, these codes work great for squarespace 7.0 & 7.1.
If you are on Squarespace 7.0 you could use a cover page to do this as these are pretty much already stand-alone pages. Keep in mind though, 7.1 does not have cover pages. However, while they can definitely look nice, cover pages are pretty limited in their design/styling options, therefore, I recommend using an index or a regular page. I personally utilize regular pages here.
It’s a super simple process, and a little CSS goes a long way to making the perfect landing page!
01. Create the Landing page
Create the landing page in your Not-Linked section.
If you are on Squarespace 7.0 you might want to use an index to create sections for your page. Do not add this page to your Main Navigation, this will only confuse visitors to your site. Essentially, they will click on it but have no way to get back, since we remove the headers and footers.
02. Find the Collection ID number

Locate the Collection ID number for your landing page or index. The easiest way to do this is to use this Chrome browser extension. If you are unable to use the extension you need to go into the page code to find the Collection ID. Right-click anywhere on your page and select “Inspect” (Chrome), this will open up a source code window. Scroll up the code until you see the body id tag, it will look something like this:
”#collection-5fb6eee55437a56fd07e4b8f”
This will be located fairly at the top of the page, just below the <header> content.
03. Copy & Paste
Copy and save the collection-number somewhere in case you lose your spot.
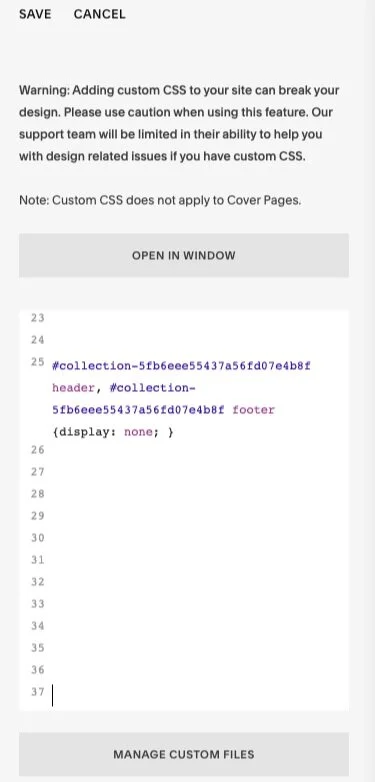
Go to > Design > Custom CSS and paste the code below into the window. Make sure you use the correct code relation to your template.
04. Input
Replace every “Collection-ID” that you have with the Collection ID number that you saved, simply copy and paste. BAM — You’re done! Pop the Prosecco you are a CSS master!!!
05. Design / Style
Now it’s time to design your layout and make your stylistic changes If you are on 7.0 then indexes work well for landing pages since you can create sections for the different parts of your page, i.e. welcome message, testimonials, details on offer, about section, faqs etc.
If you are on 7.1 then this is really easy: you just build your page using sections and apply the background colours or images you’d like to use via the section settings like on any other page of your site!

This is what your page will look like — No headers, no footers. You can also opt to just remove the headers OR the footers by only adding the header OR footer section of the code into the Custom CSS area.
The Codes
You can use the codes below for your correlating website template.
Bedford Family
/* Hide Landing Page Header and Footer */
#collection-ID Header, #collection-ID #preFooter, #collection-ID #footer {display: none !important;}
Brine Family
/* Hide Landing Page Header and Footer */
#collection-ID .Header, #collection-ID .Footer {display: none !important;}
Pacific Family
/* Hide Landing Page Header and Footer */
#collection-ID #header, #collection-ID #prefooter, #collection-ID #footer {display: none;}
York Family
/* Hide Landing Page Header and Footer */
#collection-ID .site-header, #collection-ID .site-footer {display: none !important;}
7.1
#collection-ID header, #collection-ID footer {display: none; }
Let me know if you use this in your own site! I’d love to check out your CSS work!!